spring boot启动流程
主类入口与初始化
- 程序入口为标注
@SpringBootApplication的主类, 通过main()方法调用SpringApplication.run()启动 @SpringBootApplication包含三个核心注解:@Configuration(声明配置类)、@EnableAutoConfiguration(启用自动配置)、@ComponentScan(组件扫描)
- 程序入口为标注
SpringApplication 实例化
- 创建
SpringApplication对象时, 会通过SpringFactoriesLoader加载META-INF/spring.factories中的初始化器(ApplicationContextInitializer)和监听器(ApplicationListener) - 推断应用类型(Web 应用或非 Web 应用), 决定后续创建哪种
ApplicationContext
- 创建
环境准备与配置加载
- 加载
application.properties/yml及环境变量, 构建ConfigurableEnvironment对象 - 通过
PropertySources管理配置优先级(如命令行参数 > 系统变量 > 配置文件)
- 加载
创建应用上下文
- Web 应用默认创建
AnnotationConfigServletWebServerApplicationContext, 非 Web 应用创建AnnotationConfigApplicationContext - 上下文初始化包括:设置环境变量、注册
BeanFactoryPostProcessor等
- Web 应用默认创建
刷新上下文(核心阶段)
- Bean 定义加载: 扫描
@Component等注解的类, 注册 Bean 定义 - 自动配置: 根据类路径依赖(如
spring-boot-starter-web)激活 Tomcat、DataSource 等组件的条件装配 - 依赖注入: 通过
@Autowired完成 Bean 之间的依赖关系注入 - 扩展点执行: 调用
BeanPostProcessor和BeanFactoryPostProcessor(如处理 AOP、事务等)
- Bean 定义加载: 扫描
内嵌 Web 服务器启动
- 若为 Web 应用, 启动 Tomcat/Jetty 服务器, 绑定端口(默认 8080)
- 初始化 Servlet 容器(如 DispatcherServlet), 完成 Spring MVC 配置
后置处理与启动完成
- 执行
CommandLineRunner和ApplicationRunner接口的实现类, 用于启动后执行初始化任务 - 发布
ApplicationReadyEvent事件, 通知监听器应用已就绪
- 执行
Important
以下源代码均基于 spring-boot: 2.1.3 RELEASE
创建spring application实例
public SpringApplication(ResourceLoader resourceLoader, Class<?>... primarySources) {
  this.sources = new LinkedHashSet();
  this.bannerMode = Mode.CONSOLE;
  this.logStartupInfo = true;
  this.addCommandLineProperties = true;
  this.addConversionService = true;
  this.headless = true;
  this.registerShutdownHook = true;
  this.additionalProfiles = new HashSet();
  this.isCustomEnvironment = false;
  this.resourceLoader = resourceLoader;
  Assert.notNull(primarySources, "PrimarySources must not be null");
  this.primarySources = new LinkedHashSet(Arrays.asList(primarySources));
  this.webApplicationType = WebApplicationType.deduceFromClasspath();
  this.setInitializers(this.getSpringFactoriesInstances(ApplicationContextInitializer.class));
  this.setListeners(this.getSpringFactoriesInstances(ApplicationListener.class));
  this.mainApplicationClass = this.deduceMainApplicationClass();
}添加源: 将提供的源(通常是配置类)添加到应用的源列表中
设置 Web 环境: 判断应用是否应该运行在 Web 环境中, 这会影响后续的 Web 相关配置
加载初始化器: 从 spring.factories 文件中加载所有列出的 ApplicationContextInitializer 实现, 并将它们设置到 SpringApplication 实例中, 以便在应用上下文的初始化阶段执行它们
这一步是 Spring Boot 的自动配置的核心, 因为在这一步会从
spring.factories文件中加载并实例化指定类型的类private <T> Collection<T> getSpringFactoriesInstances(Class<T> type, Class<?>[] parameterTypes, Object... args) { // 获取当前线程的上下文类加载器 ClassLoader classLoader = this.getClassLoader(); // 从spring.factories加载指定类型的工厂名称, 并使用LinkedHashSet确保名称的唯一性, 以防重复 Set<String> names = new LinkedHashSet(SpringFactoriesLoader.loadFactoryNames(type, classLoader)); // 创建指定类型的实例。这里使用反射来实例化类, 并传入任何必要的参数 List<T> instances = this.<T>createSpringFactoriesInstances(type, parameterTypes, classLoader, args, names); // 对实例进行排序, 这里使用的是Spring的注解感知比较器, 可以处理@Order注解和Ordered接口 AnnotationAwareOrderComparator.sort(instances); // 返回实例集合 return instances; }设置监听器: 加载和设置 ApplicationListener 实例, 以便应用能够响应不同的事件
确定主应用类: 确定主应用类, 这个主应用程序类通常是包含
public static void main(String[] args)方法的类, 是启动整个 Spring Boot 应用的入口点
执行run方法
启动核心流程并返回 ConfigurableApplicationContext 容器
public ConfigurableApplicationContext run(String... args) {
  // 创建并启动一个计时器, 用于记录应用启动耗时
  StopWatch stopWatch = new StopWatch();
  stopWatch.start();

  ConfigurableApplicationContext context = null;
  FailureAnalyzers analyzers = null;

  // 配置无头(headless)属性, 影响图形环境的处理
  configureHeadlessProperty();

  // 获取应用运行监听器, 并触发开始事件
  SpringApplicationRunListeners listeners = getRunListeners(args);
  listeners.starting();

  try {
    // 创建应用参数对象
    ApplicationArguments applicationArguments = new DefaultApplicationArguments(args);
    // 准备环境, 包括配置文件和属性源
    ConfigurableEnvironment environment = prepareEnvironment(listeners, applicationArguments);
    // 打印应用的 Banner
    Banner printedBanner = printBanner(environment);
    // 创建应用上下文
    context = createApplicationContext();
    // 创建失败分析器
    analyzers = new FailureAnalyzers(context);
    // 准备上下文, 包括加载 bean 定义
    prepareContext(context, environment, listeners, applicationArguments, printedBanner);
    // 刷新上下文, 完成 bean 的创建和初始化
    refreshContext(context);
    // 刷新后的后置处理
    afterRefresh(context, applicationArguments);
    // 通知监听器, 应用运行完成
    listeners.finished(context, null);
    // 停止计时器
    stopWatch.stop();
    // 如果启用了启动信息日志, 记录应用的启动信息
    if (this.logStartupInfo) {
        new StartupInfoLogger(this.mainApplicationClass).logStarted(getApplicationLog(), stopWatch);
    }
    //触发ApplicationStartedEvent 事件
    listeners.started(context);
    //调用实现了 CommandLineRunner 和 ApplicationRunner 接口的 bean 中的 run 方法
    callRunners(context, applicationArguments);
    // 触发 ApplicationReadyEvent 事件
    listeners.running(context);
    // 返回配置好的应用上下文
    return context;
  }
  catch (Throwable ex) {
    // 处理运行失败的情况
    handleRunFailure(context, listeners, analyzers, ex);
    throw new IllegalStateException(ex);
  }
}
启动&停止计时器: 使用 stopWatch 来进行计时, 用来统计启动过程的时长的。最终在应用启动信息输出的实时打印出来
获取和启动监听器:
这一步从
spring.factories中解析初始所有的SpringApplicationRunListener实例, 并通知他们应用的启动过程已经开始Note
SpringApplicationRunListener 是 Spring Boot 中用于监听应用启动过程的核心接口,通过其生命周期钩子方法,开发者可以在不同阶段插入自定义逻辑
starting(): 应用启动时触发environmentPrepared(): 环境配置完成后触发,可动态调整环境变量contextPrepared(): 当 ApplicationContext 准备好但在它加载之前调用, 可以用于对上下文进行一些预处理contextLoaded(): 当 ApplicationContext 被加载(但在它被刷新之前)时调用, 这个阶段所有的 bean 定义都已经加载但还未实例化started(): 在 ApplicationContext 刷新之后、任何应用和命令行运行器被调用之前调用, 此时应用已经准备好接收请求ready()(Spring Boot 2.6+)或running()(旧版本): 应用完全就绪时触发failed(): 如果启动过程中出现异常, 则调用此方法
装配环境参数
prepareEnvironment方法会加载应用的外部配置。这包括application.properties或application.yml文件中的属性, 环境变量, 系统属性等。用户自定义的那些参数就是在这一步被绑定的打印 Banner: 这一步的作用很简单, 就是在控制台打印应用的启动横幅 Banner
创建应用上下文: 这一步就真的开始启动了, 第一步就是先要创建一个 Spring 的上下文出来, 只有有了这个上下文才能进行 Bean 的加载、配置等工作
准备上下文(核心步骤)
private void prepareContext(ConfigurableApplicationContext context, ConfigurableEnvironment environment,
        SpringApplicationRunListeners listeners, ApplicationArguments applicationArguments, Banner printedBanner) {

  // 将environment设置到应用上下文中
  context.setEnvironment(environment);

  // 对应用上下文进行后处理(可能涉及一些自定义逻辑)
  postProcessApplicationContext(context);

  // 应用所有的ApplicationContextInitializer
  applyInitializers(context);

  // 通知监听器上下文准备工作已完成
  listeners.contextPrepared(context);

  // 如果启用了启动信息日志, 则记录启动信息和配置文件信息
  if (this.logStartupInfo) {
      logStartupInfo(context.getParent() == null);
      logStartupProfileInfo(context);
  }

  // 向上下文中添加特定于 Spring Boot 的单例 Bean
  context.getBeanFactory().registerSingleton("springApplicationArguments", applicationArguments);
  if (printedBanner != null) {
      context.getBeanFactory().registerSingleton("springBootBanner", printedBanner);
  }

  // 加载应用的源(如配置类)
  Set<Object> sources = getSources();
  Assert.notEmpty(sources, "Sources must not be empty");
  load(context, sources.toArray(new Object[sources.size()]));

  // 通知监听器上下文加载已完成
  listeners.contextLoaded(context);
}
刷新上下文: 这一步, 是 Spring 启动的核心步骤了, 这一步骤包括了实例化所有的 Bean、设置它们之间的依赖关系以及执行其他的初始化任务
AbstractApplicationContext.
refresh这一步中, 主要就是创建 BeanFactory, 然后再通过 BeanFactory 来实例化 Bean 同时包括 Web 容器的启动, 及Tomcat 的启动也是在这个步骤
@Override
public void refresh() throws BeansException, IllegalStateException {
  synchronized (this.startupShutdownMonitor) {
    // 为刷新操作准备此上下文
    prepareRefresh();

    // 告诉子类刷新内部 bean 工厂
    ConfigurableListableBeanFactory beanFactory = obtainFreshBeanFactory();

    // 为在此上下文中使用做好 bean 工厂的准备工作
    prepareBeanFactory(beanFactory);

    try {
      // 允许在上下文子类中对 bean 工厂进行后置处理
      postProcessBeanFactory(beanFactory);

      // 调用在上下文中注册为 bean 的工厂处理器
      invokeBeanFactoryPostProcessors(beanFactory);

      // 注册拦截 bean 创建的 bean 处理器
      registerBeanPostProcessors(beanFactory);

      // 初始化此上下文的消息源
      initMessageSource();

      // 初始化此上下文的事件多播器
      initApplicationEventMulticaster();

      // 在特定上下文子类中初始化其他特殊 bean
      onRefresh();

      // 检查监听器 bean 并注册它们
      registerListeners();

      // 实例化所有剩余的(非懒加载)单例
      finishBeanFactoryInitialization(beanFactory);

      // 最后一步: 发布相应的事件
      finishRefresh();
    }

    catch (BeansException ex) {
      if (logger.isWarnEnabled()) {
        logger.warn("Exception encountered during context initialization - " +
            "cancelling refresh attempt: " + ex);
      }

      // 销毁已经创建的单例以避免悬挂资源
      destroyBeans();

      // 重置“激活”标志
      cancelRefresh(ex);

      // 将异常传播给调用者
      throw ex;
    }

    finally {
      // 在 Spring 的核心中重置常见的内省缓存, 因为我们可能不再需要单例 bean 的元数据...
      resetCommonCaches();
    }
  }
}
bean生命周期
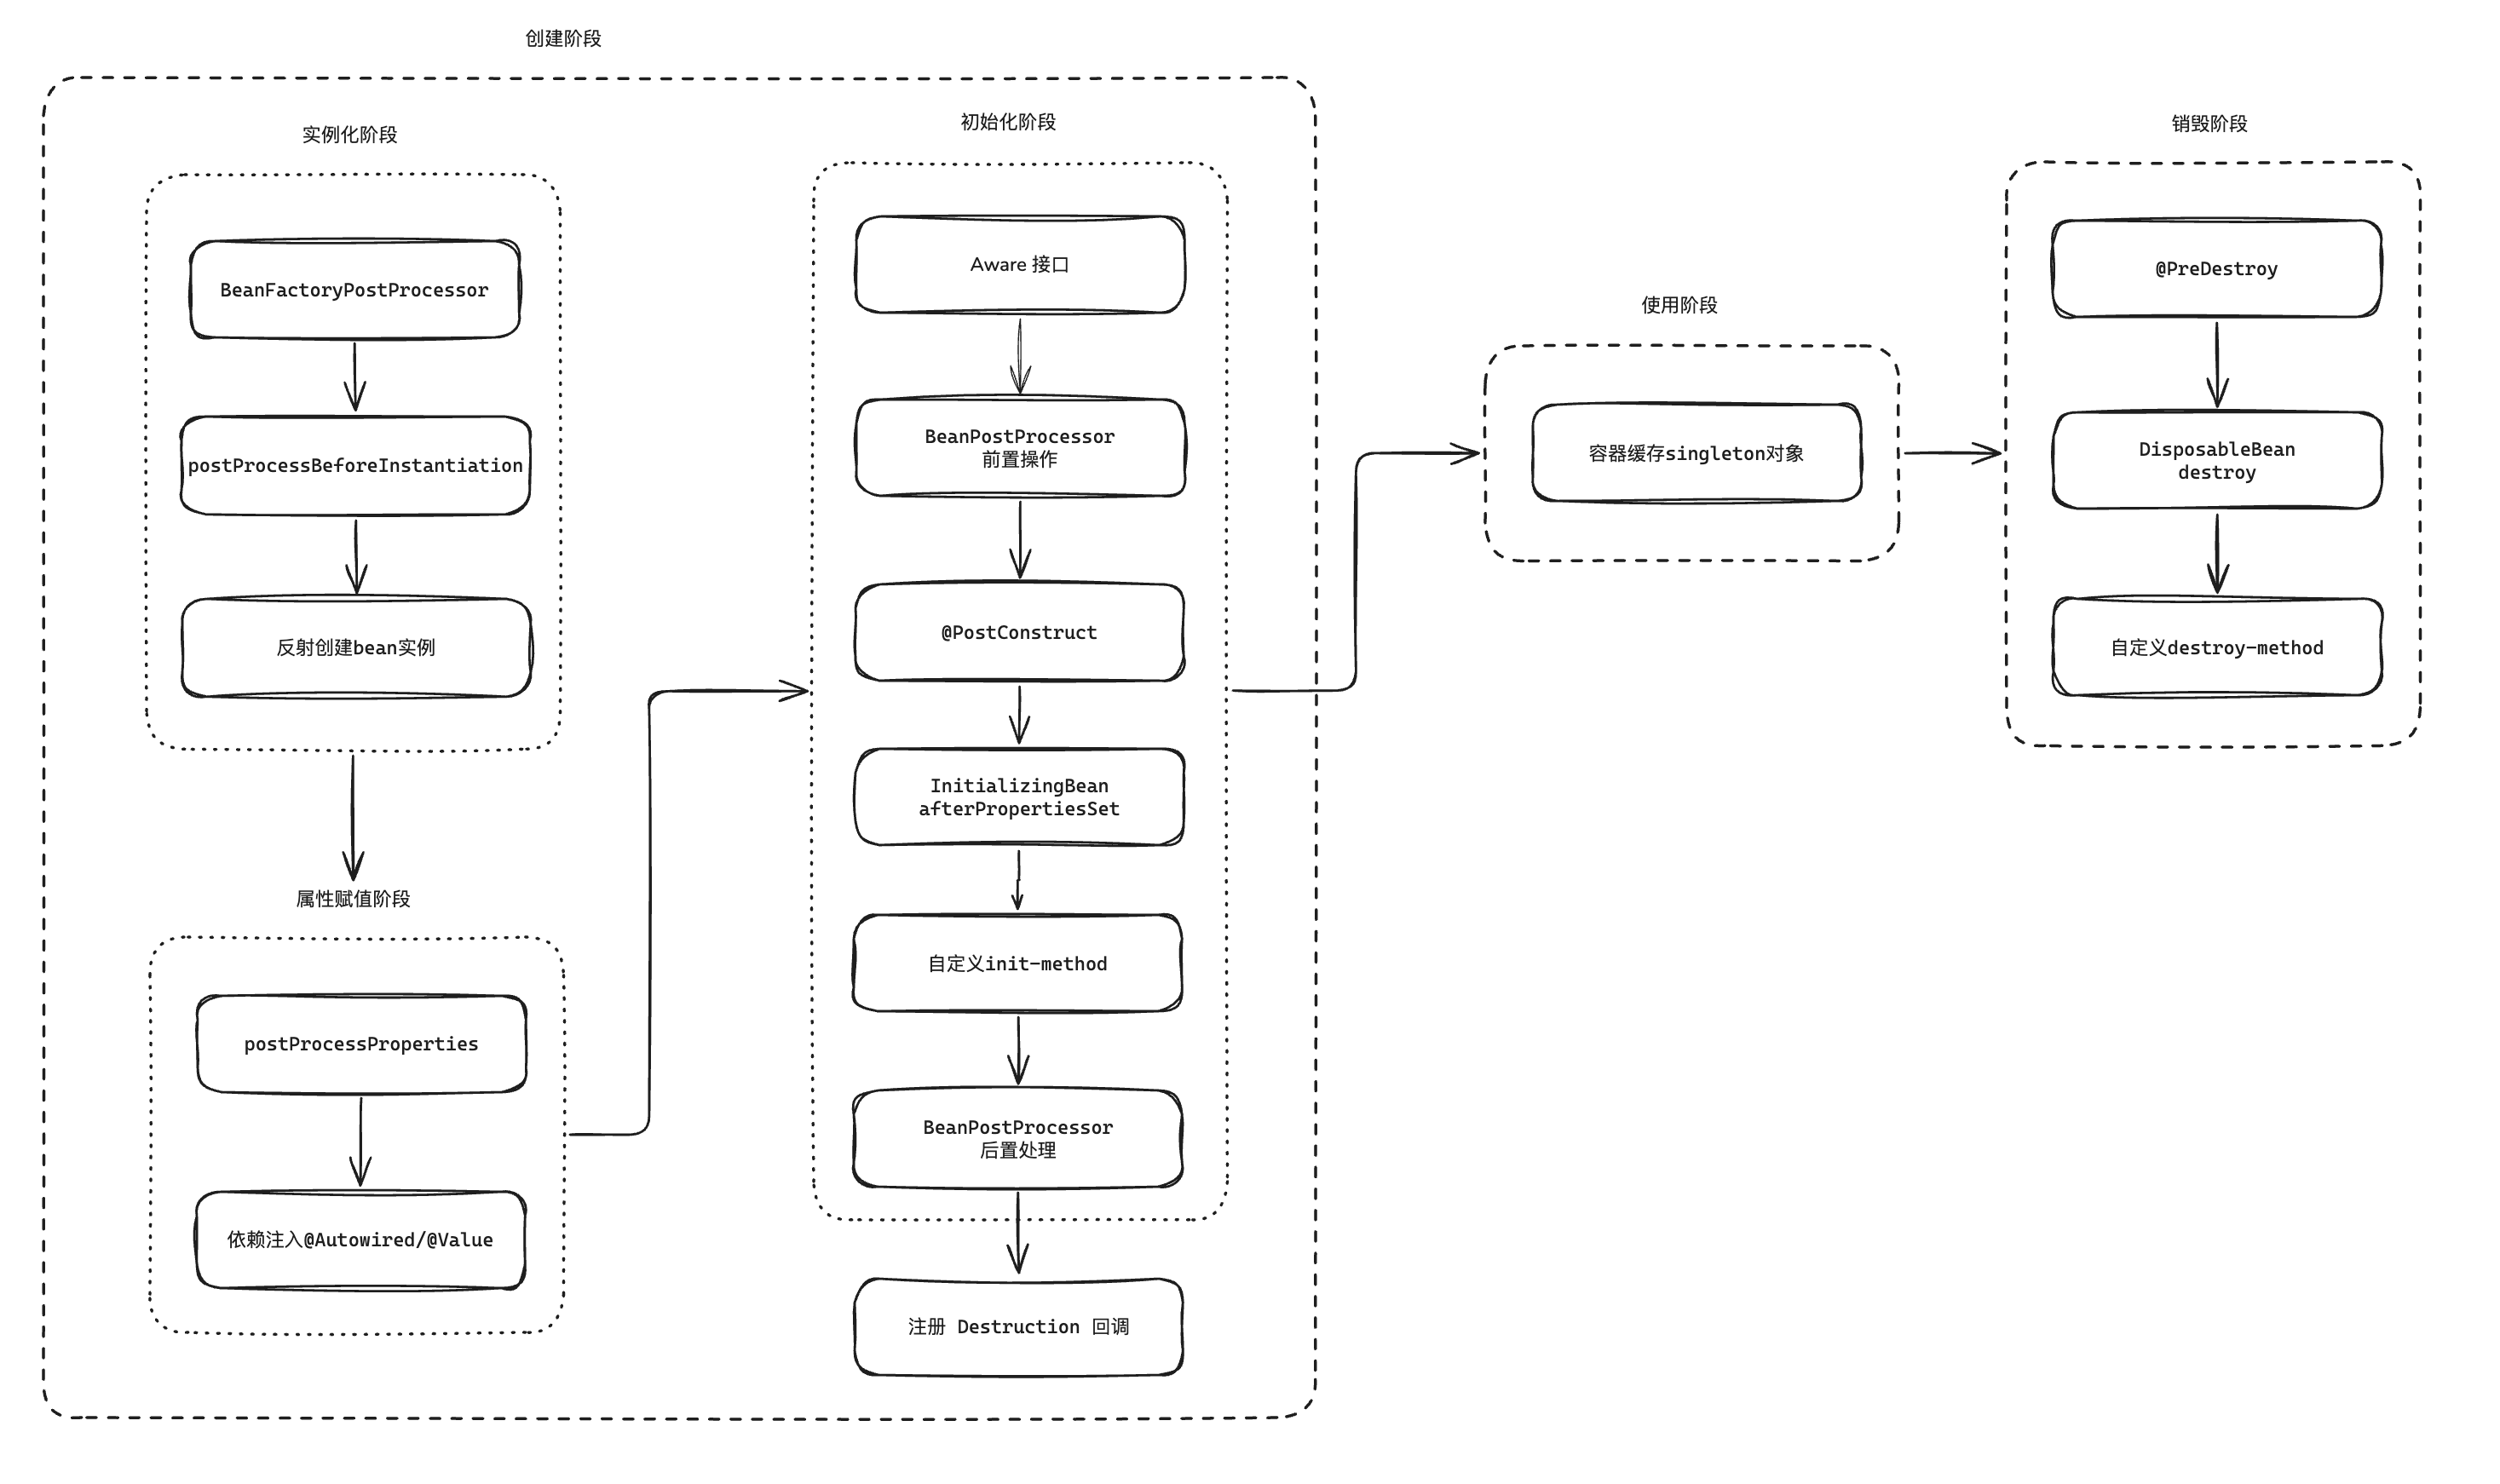
bean的生命周期可以总结为三个阶段: 创建、使用、销毁, 其中创建过程可以再细化为: 实例化、属性赋值、初始化
实例化阶段
BeanFactoryPostProcessor: 可修改 BeanDefinition 元数据
BeanDefinitionRegistryPostProcessor作为BeanFactoryPostProcessor的子接口, 支持更底层的Bean定义注册操作(如新增或删除BeanDefinition)InstantiationAwareBeanPostProcessor.postProcessBeforeInstantiation: 可拦截实例化过程, 实现动态代理/AOP
属性赋值阶段
- InstantiationAwareBeanPostProcessor.postProcessProperties: 可修改属性值/跳过默认注入
初始化阶段
- Aware 接口: 获取 BeanName/BeanFactory 等容器信息
- BeanPostProcessor.postProcessBeforeInitialization(前置处理): 可进行属性验证/预处理
- @PostConstruct: 自定义初始化逻辑
- InitializingBean.afterPropertiesSet: 属性设置完成后执行初始化
- init-method: 通过 XML 或 @Bean(initMethod="init") 显式指定, spring会调用
- BeanPostProcessor.postProcessAfterInitialization(后置处理): 生成代理对象(AOP)/功能增强
销毁阶段
- @PreDestroy: 自定义资源释放逻辑
- DisposableBean.destroy: 容器关闭时执行销毁
- destroy-method: 最后处理, 仅对 singleton 作用域的 Bean 有效
Important
以下源代码均基于 spring-bean: 5.1.5 RELEASE
实例化过程
处理BeanDefinition
AbstractApplicationContext.refresh
执行时机:Bean 定义加载完成之后, Bean 实例化之前
(所有BeanDefinition已加载到 BeanFactory 中, 但尚未实例化任何 Bean)
通过invokeBeanFactoryPostProcessors(beanFactory)触发所有BeanFactoryPostProcessor的执行
(实现委托给PostProcessorRegistrationDelegate.invokeBeanFactoryPostProcessors()类)
在PostProcessorRegistrationDelegate的处理中
- 优先调用
BeanDefinitionRegistryPostProcessor.postProcessBeanDefinitionRegistry(), 用于新增/修改BeanDefinition
(如ConfigurationClassPostProcessor解析@Configuration类) - 随后调用
BeanFactoryPostProcessor.postProcessBeanFactory(), 处理BeanFactory的元数据修改
(如 PropertySourcesPlaceholderConfigurer 解析占位符)
拦截实例化过程
AbstractAutowireCapableBeanFactory.createBean
在createBean中调用了resolveBeforeInstantiation, 该方法会触发所有的InstantiationAwareBeanPostProcessor.postProcessBeforeInstantiation, 如果返回的Bean != null则直接替代原始Bean的实例化, 跳过后续的实例化过程
protected Object createBean(String beanName, RootBeanDefinition mbd, @Nullable Object[] args) throws BeanCreationException {
  ...

  try {
    // 触发所有InstantiationAwareBeanPostProcessor的postProcessBeforeInstantiation()方法
    Object bean = this.resolveBeforeInstantiation(beanName, mbdToUse);
    if (bean != null) {
        return bean;
    }
  } catch (Throwable ex) {
    throw new BeanCreationException(mbdToUse.getResourceDescription(), beanName, "BeanPostProcessor before instantiation of bean failed", ex);
  }

  try {
    Object beanInstance = this.doCreateBean(beanName, mbdToUse, args);
    if (this.logger.isTraceEnabled()) {
        this.logger.trace("Finished creating instance of bean '" + beanName + "'");
    }

    return beanInstance;
  } catch (ImplicitlyAppearedSingletonException | BeanCreationException ex) {
    throw ex;
  } catch (Throwable ex) {
    throw new BeanCreationException(mbdToUse.getResourceDescription(), beanName, "Unexpected exception during bean creation", ex);
  }
}

@Nullable
protected Object resolveBeforeInstantiation(String beanName, RootBeanDefinition mbd) {
  Object bean = null;
  if (!Boolean.FALSE.equals(mbd.beforeInstantiationResolved)) {
    if (!mbd.isSynthetic() && this.hasInstantiationAwareBeanPostProcessors()) {
      Class<?> targetType = this.determineTargetType(beanName, mbd);
      if (targetType != null) {
        // 调用postProcessBeforeInstantiation
        bean = this.applyBeanPostProcessorsBeforeInstantiation(targetType, beanName);
        if (bean != null) {
          // 若返回非空对象(如动态代理对象), 则跳过后续实例化流程
          bean = this.applyBeanPostProcessorsAfterInitialization(bean, beanName);
        }
      }
    }

    mbd.beforeInstantiationResolved = bean != null;
  }

  return bean;
}
整个 Bean 的创建的过程都依赖于 AbstractAutowireCapableBeanFactory, 而销毁的过程主要依赖于 DisposableBeanAdapter
创建过程
AbstractAutowireCapableBeanFactory 的 doCreateBean 的核心代码如下, 其中包含了实例化、设置属性值、初始化 Bean 以及注册销毁回调的几个核心方法
protected Object doCreateBean(final String beanName, final RootBeanDefinition mbd, final Object[] args) throws BeanCreationException {

  // 实例化bean
  BeanWrapper instanceWrapper = null;
  if (instanceWrapper == null) {
    instanceWrapper = createBeanInstance(beanName, mbd, args);
  }

  // ...

  Object exposedObject = bean;
  try {
    //设置属性值
    populateBean(beanName, mbd, instanceWrapper);
    if (exposedObject != null) {
      //初始化Bean
      exposedObject = initializeBean(beanName, exposedObject, mbd);
    }
  }

  // ...

  // 注册Bean的销毁回调
  try {
    registerDisposableBeanIfNecessary(beanName, bean, mbd);
  }

  return exposedObject;
}
实例化Bean
AbstractAutowireCapableBeanFactory.createBeanInstance
主要做了如下事情:
- 确保 Bean 对应的类已经被加载, 且是
public的 - 如果有工厂方法, 则直接调用工厂方法创建, 否则使用无参构造方法创建实例
查看源码实现
protected BeanWrapper createBeanInstance(String beanName, RootBeanDefinition mbd, @Nullable Object[] args) {
  // 解析Bean的类, 确保Bean的类在这个点已经被确定
  Class<?> beanClass = this.resolveBeanClass(mbd, beanName, new Class[0]);
  // 检查Bean的访问权限, 确保非public类允许访问
  if (beanClass != null && !Modifier.isPublic(beanClass.getModifiers()) && !mbd.isNonPublicAccessAllowed()) {
      throw new BeanCreationException(mbd.getResourceDescription(), beanName, "Bean class isn't public, and non-public access not allowed: " + beanClass.getName());
  } else {
    Supplier<?> instanceSupplier = mbd.getInstanceSupplier();
    if (instanceSupplier != null) {
        return this.obtainFromSupplier(instanceSupplier, beanName);
    // 如果Bean定义中指定了工厂方法, 则通过工厂方法创建Bean实例
    } else if (mbd.getFactoryMethodName() != null) {
        return this.instantiateUsingFactoryMethod(beanName, mbd, args);
    } else {
      // 当重新创建相同的Bean时的快捷路径
      boolean resolved = false;
      boolean autowireNecessary = false;
      if (args == null) {
        synchronized(mbd.constructorArgumentLock) {
          if (mbd.resolvedConstructorOrFactoryMethod != null) {
            resolved = true;
            autowireNecessary = mbd.constructorArgumentsResolved;
          }
        }
      }

      if (resolved) {
        // 如果需要自动装配构造函数参数, 则调用相应方法进行处理, 否则使用无参构造函数或默认构造方法创建实例
        return autowireNecessary ? this.autowireConstructor(beanName, mbd, (Constructor[])null, (Object[])null) : this.instantiateBean(beanName, mbd);
      } else {
        // 通过BeanPostProcessors确定构造函数候选
        Constructor<?>[] ctors = this.determineConstructorsFromBeanPostProcessors(beanClass, beanName);
        if (ctors == null && mbd.getResolvedAutowireMode() != 3 && !mbd.hasConstructorArgumentValues() && ObjectUtils.isEmpty(args)) {
            ctors = mbd.getPreferredConstructors();
            // 如果有合适的构造函数或需要通过构造函数自动装配, 则使用相应的构造函数创建实例, 如果没有特殊处理, 使用默认的无参构造函数创建Bean实例
            return ctors != null ? this.autowireConstructor(beanName, mbd, ctors, (Object[])null) : this.instantiateBean(beanName, mbd);
        } else {
            return this.autowireConstructor(beanName, mbd, ctors, args);
        }
      }
    }
  }

}
属性赋值
AbstractAutowireCapableBeanFactory.populateBean
主要做了如下事情:
- 完成依赖注入(DI), 通过 Setter 或字段注入为 Bean 设置属性值
- 触发循环依赖检查, 特别是对 prototype 作用域的 Bean
- 其中根据
InstantiationAwareBeanPostProcessor.postProcessAfterInstantiation的结果来判断是否注入 - 预留了
InstantiationAwareBeanPostProcessor.postProcessProperties的扩展机制, 可修改属性值/跳过默认注入
查看源码实现
protected void populateBean(String beanName, RootBeanDefinition mbd, @Nullable BeanWrapper bw) {
  if (bw == null) {
    // 如果BeanWrapper为空, 则无法设置属性值
    if (mbd.hasPropertyValues()) {
        throw new BeanCreationException(mbd.getResourceDescription(), beanName, "Cannot apply property values to null instance");
    }
  } else {
    // 在设置属性之前, 给InstantiationAwareBeanPostProcessors机会修改Bean状态
    // 这可以用于支持字段注入等样式
    boolean continueWithPropertyPopulation = true;
    // 如果Bean不是合成的, 并且存在InstantiationAwareBeanPostProcessor, 执行后续处理
    if (!mbd.isSynthetic() && this.hasInstantiationAwareBeanPostProcessors()) {
      for(BeanPostProcessor bp : this.getBeanPostProcessors()) {
        if (bp instanceof InstantiationAwareBeanPostProcessor) {
          InstantiationAwareBeanPostProcessor ibp = (InstantiationAwareBeanPostProcessor)bp;
          // 如果postProcessAfterInstantiation任一返回false, 则停止属性填充
          if (!ibp.postProcessAfterInstantiation(bw.getWrappedInstance(), beanName)) {
              continueWithPropertyPopulation = false;
              break;
          }
        }
      }
    }

    if (continueWithPropertyPopulation) {
      PropertyValues pvs = mbd.hasPropertyValues() ? mbd.getPropertyValues() : null;
      if (mbd.getResolvedAutowireMode() == 1 || mbd.getResolvedAutowireMode() == 2) {
        MutablePropertyValues newPvs = new MutablePropertyValues(pvs);
        if (mbd.getResolvedAutowireMode() == 1) {
          // 如果是按名称自动装配, 添加相应的属性值
          this.autowireByName(beanName, mbd, bw, newPvs);
        }

        if (mbd.getResolvedAutowireMode() == 2) {
          // 如果是按类型自动装配, 添加相应的属性值
          this.autowireByType(beanName, mbd, bw, newPvs);
        }

        pvs = newPvs;
      }

      boolean hasInstAwareBpps = this.hasInstantiationAwareBeanPostProcessors();
      boolean needsDepCheck = mbd.getDependencyCheck() != 0;
      PropertyDescriptor[] filteredPds = null;
      if (hasInstAwareBpps) {
        if (pvs == null) {
            pvs = mbd.getPropertyValues();
        }

        for(BeanPostProcessor bp : this.getBeanPostProcessors()) {
          if (bp instanceof InstantiationAwareBeanPostProcessor) {
            InstantiationAwareBeanPostProcessor ibp = (InstantiationAwareBeanPostProcessor)bp;
            // 可修改属性值/跳过默认注入
            PropertyValues pvsToUse = ibp.postProcessProperties(pvs, bw.getWrappedInstance(), beanName);
            if (pvsToUse == null) {
              if (filteredPds == null) {
                  filteredPds = this.filterPropertyDescriptorsForDependencyCheck(bw, mbd.allowCaching);
              }

              pvsToUse = ibp.postProcessPropertyValues(pvs, filteredPds, bw.getWrappedInstance(), beanName);
              if (pvsToUse == null) {
                  return;
              }
            }

            pvs = pvsToUse;
          }
        }
      }

      if (needsDepCheck) {
        if (filteredPds == null) {
            filteredPds = this.filterPropertyDescriptorsForDependencyCheck(bw, mbd.allowCaching);
        }
        // 检查循环依赖
        this.checkDependencies(beanName, mbd, filteredPds, pvs);
      }

      if (pvs != null) {
        // 应用属性值
        this.applyPropertyValues(beanName, mbd, bw, pvs);
      }
    }
  }
}
初始化Bean
AbstractAutowireCapableBeanFactory.initializeBean
主要做了如下事情:
如果 Bean 实现了 Aware 接口, spring 会调用他们
- BeanNameAware: 该接口让 Bean 可以获取到自己在 Spring 容器中的名字。这对于需要根据 Bean 的名称进行某些操作的场景很有用。
- BeanClassLoaderAware: 该接口让 Bean 能够访问加载它的类加载器。这在需要进行类加载操作时特别有用, 例如动态加载类。
- BeanFactoryAware: 该接口可以获取对 BeanFactory 的引用, 获得对 BeanFactory 的访问权限
调用
BeanPostProcessor.postProcessBeforeInitialization(前置处理)执行初始化
- 调用
InitializingBean.afterPropertiesSet - 调用
init-method
- 调用
调用
BeanPostProcessor.postProcessAfterInitialization(后置处理)
查看源码实现
protected Object initializeBean(String beanName, Object bean, @Nullable RootBeanDefinition mbd) {
  // 执行aware方法
  if (System.getSecurityManager() != null) {
    AccessController.doPrivileged(() -> {
        this.invokeAwareMethods(beanName, bean);
        return null;
    }, this.getAccessControlContext());
  } else {
    this.invokeAwareMethods(beanName, bean);
  }

  // 执行BeanPostProcessor的前置处理
  Object wrappedBean = bean;
  if (mbd == null || !mbd.isSynthetic()) {
    wrappedBean = this.applyBeanPostProcessorsBeforeInitialization(bean, beanName);
  }

  // 调用初始化方法
  try {
    this.invokeInitMethods(beanName, wrappedBean, mbd);
  } catch (Throwable ex) {
    throw new BeanCreationException(mbd != null ? mbd.getResourceDescription() : null, beanName, "Invocation of init method failed", ex);
  }

  if (mbd == null || !mbd.isSynthetic()) {
    wrappedBean = this.applyBeanPostProcessorsAfterInitialization(wrappedBean, beanName);
  }

  return wrappedBean;
}private void invokeAwareMethods(String beanName, Object bean) {
if (bean instanceof Aware) {
if (bean instanceof BeanNameAware) {
((BeanNameAware)bean).setBeanName(beanName);
}
if (bean instanceof BeanClassLoaderAware) {
ClassLoader bcl = this.getBeanClassLoader();
if (bcl != null) {
((BeanClassLoaderAware)bean).setBeanClassLoader(bcl);
}
}
if (bean instanceof BeanFactoryAware) {
((BeanFactoryAware)bean).setBeanFactory(this);
}
}
}// 遍历所有的BeanPostProcessor的实现, 执行他的postProcessBeforeInitialization方法
@Override
public Object applyBeanPostProcessorsBeforeInitialization(Object existingBean, String beanName)
throws BeansException {
Object result = existingBean;
for (BeanPostProcessor processor : getBeanPostProcessors()) {
result = processor.postProcessBeforeInitialization(result, beanName);
if (result == null) {
return result;
}
}
return result;
}protected void invokeInitMethods(String beanName, Object bean, @Nullable RootBeanDefinition mbd) throws Throwable {
boolean isInitializingBean = bean instanceof InitializingBean;
if (isInitializingBean && (mbd == null || !mbd.isExternallyManagedInitMethod("afterPropertiesSet"))) {
if (this.logger.isTraceEnabled()) {
this.logger.trace("Invoking afterPropertiesSet() on bean with name '" + beanName + "'");
}
if (System.getSecurityManager() != null) {
try {
AccessController.doPrivileged(() -> {
((InitializingBean)bean).afterPropertiesSet();
return null;
}, this.getAccessControlContext());
} catch (PrivilegedActionException pae) {
throw pae.getException();
}
} else {
((InitializingBean)bean).afterPropertiesSet();
}
}
if (mbd != null && bean.getClass() != NullBean.class) {
String initMethodName = mbd.getInitMethodName();
if (StringUtils.hasLength(initMethodName) && (!isInitializingBean || !"afterPropertiesSet".equals(initMethodName)) && !mbd.isExternallyManagedInitMethod(initMethodName)){
this.invokeCustomInitMethod(beanName, bean, mbd);
}
}
}public Object applyBeanPostProcessorsAfterInitialization(Object existingBean, String beanName) throws BeansException {
Object result = existingBean;
for(BeanPostProcessor processor : this.getBeanPostProcessors()) {
Object current = processor.postProcessAfterInitialization(result, beanName);
if (current == null) {
return result;
}
result = current;
}
return result;
}处理循环依赖
具体功能如下:
检测早期单例暴露: 如果
earlySingletonExposure为true, 表示当前 Bean 可能存在循环依赖, 需要提前暴露其引用。获取早期单例引用: 调用
this.getSingleton(beanName, false)获取该 Bean 的早期引用。处理早期引用与最终实例的关系:
- 如果早期引用与当前暴露的对象相同, 则直接使用早期引用。
- 如果早期引用与当前暴露的对象不同, 并且
allowRawInjectionDespiteWrapping为false, 则检查是否有依赖该 Bean 的其他 Bean。
检查依赖 Bean 的状态:
- 遍历依赖该 Bean 的其他 Bean, 判断它们是否仅为类型检查而创建。
- 如果存在未完成的依赖 Bean, 则抛出
BeanCurrentlyInCreationException异常, 提示循环依赖问题。
异常处理: 如果检测到循环依赖, 抛出异常并提供详细信息。
查看源码实现
if (earlySingletonExposure) {
  Object earlySingletonReference = this.getSingleton(beanName, false);
  if (earlySingletonReference != null) {
    if (exposedObject == bean) {
        exposedObject = earlySingletonReference;
    } else if (!this.allowRawInjectionDespiteWrapping && this.hasDependentBean(beanName)) {
      String[] dependentBeans = this.getDependentBeans(beanName);
      Set<String> actualDependentBeans = new LinkedHashSet(dependentBeans.length);

      for(String dependentBean : dependentBeans) {
        if (!this.removeSingletonIfCreatedForTypeCheckOnly(dependentBean)) {
            actualDependentBeans.add(dependentBean);
        }
      }

      if (!actualDependentBeans.isEmpty()) {
        throw new BeanCurrentlyInCreationException(beanName, "Bean with name '" + beanName + "' has been injected into other beans [" + StringUtils.collectionToCommaDelimitedString(actualDependentBeans) + "] in its raw version as part of a circular reference, but has eventually been wrapped. This means that said other beans do not use the final version of the bean. This is often the result of over-eager type matching - consider using 'getBeanNamesOfType' with the 'allowEagerInit' flag turned off, for example.");
      }
    }
  }
}
注册 Destruction 回调
AbstractAutowireCapableBeanFactory.registerDisposableBeanIfNecessary
如果 Bean 实现了 DisposableBean 接口或在 Bean 定义中指定了自定义的销毁方法, Spring 容器会为这些 Bean 注册一个销毁回调, 确保在容器关闭时能够正确地清理资源
查看源码实现
protected void registerDisposableBeanIfNecessary(String beanName, Object bean, RootBeanDefinition mbd) {
  AccessControlContext acc = System.getSecurityManager() != null ? this.getAccessControlContext() : null;
  if (!mbd.isPrototype() && this.requiresDestruction(bean, mbd)) {
    if (mbd.isSingleton()) {
      this.registerDisposableBean(beanName, new DisposableBeanAdapter(bean, beanName, mbd, this.getBeanPostProcessors(), acc));
    } else {
      Scope scope = (Scope)this.scopes.get(mbd.getScope());
      if (scope == null) {
          throw new IllegalStateException("No Scope registered for scope name '" + mbd.getScope() + "'");
      }

      scope.registerDestructionCallback(beanName, new DisposableBeanAdapter(bean, beanName, mbd, this.getBeanPostProcessors(), acc));
    }
  }
}
销毁阶段
DisposableBeanAdapter 的 destroy 和核心代码如下, 主要功能就是做销毁
public void destroy() {
  if (!CollectionUtils.isEmpty(this.beanPostProcessors)) {
      for(DestructionAwareBeanPostProcessor processor : this.beanPostProcessors) {
          processor.postProcessBeforeDestruction(this.bean, this.beanName);
      }
  }

  if (this.invokeDisposableBean) {
    if (logger.isTraceEnabled()) {
      logger.trace("Invoking destroy() on bean with name '" + this.beanName + "'");
    }

    try {
      if (System.getSecurityManager() != null) {
        AccessController.doPrivileged(() -> {
            ((DisposableBean)this.bean).destroy();
            return null;
        }, this.acc);
      } else {
        ((DisposableBean)this.bean).destroy();
      }
    } catch (Throwable ex) {
      String msg = "Invocation of destroy method failed on bean with name '" + this.beanName + "'";
      if (logger.isDebugEnabled()) {
          logger.info(msg, ex);
      } else {
          logger.info(msg + ": " + ex);
      }
    }
  }

  if (this.destroyMethod != null) {
    this.invokeCustomDestroyMethod(this.destroyMethod);
  } else if (this.destroyMethodName != null) {
    Method methodToCall = this.determineDestroyMethod(this.destroyMethodName);
    if (methodToCall != null) {
      this.invokeCustomDestroyMethod(methodToCall);
    }
  }
}
其中提供了三个扩展机制来销毁
- @PreDestroy: 通过遍历所有注册的
DestructionAwareBeanPostProcessor, 并调用其postProcessBeforeDestruction()方法。这一步骤会扫描Bean中所有被@PreDestroy注解标记的方法并执行它们 DisposableBean.destroy- 自定义
destroy-method
最佳实践
避免过度依赖 Spring 接口
优先使用
init-method和destroy-method配置, 而非直接实现InitializingBean/DisposableBean, 以降低耦合循环依赖处理
prototype作用域的 Bean 在实例化前会通过isPrototypeCurrentlyInCreation()检查循环依赖, 而singleton作用域通过三级缓存解决性能优化建议
- 合理使用懒加载(
lazy-init)减少启动时间 - 合并
BeanPostProcessor逻辑, 避免重复处理
- 合理使用懒加载(
